Thursday, December 29, 2011

Champagne Cupcakes


Christmas was a wonderful whirl of activities and we were blessed to have all our children at home for the holiday. I really hadn't planned on taking a month long vacation from Mimi's Kitchen, but somehow it happened. Believe me, I was in the kitchen, but I didn't seem to be able to find my way to the computer.  We were having a lot of fun baking, eating and laughing with our friends and family.


 To make up for our absence, we have these beautiful champagne cupcakes to ring in the New Year. Mimi Jr. made these  (she found the recipe on The Curvy Carrot) and they really delivered on the champagne taste. They are a nice moist white cupcake, and the mellow wine taste lingers without being overpowering. These would be a great make ahead New Year's Eve dessert to have with that midnight champagne toast, or if you find you have a little left over champagne the next morning, these are the perfect way to use it up.


Champagne Cupcakes with Champagne Buttercream
Makes 22-24
Line muffin tin with liners.

2 3/4 cups all purpose flour
3 teaspoons baking powder
1 teaspoon salt
2/3 cup unsalted butter, room temperature
1 1/2 cups white sugar
3/4 cup champagne *you can use any kind you like, even flat champagne works*
6 egg whites

Mix dry ingredient together, set aside
In a large bowl cream together butter and sugar until light and fluffy.
Blend the in dry ingredients alternately with champagne.
In a clean bowl beat egg whites until stiff peaks form.
Fold 1/3 of egg white into batter to lighten it, then fold in remaining egg whites.
Fill cupcake liners about 2/3 full
Bake at 350 degrees for 20 minutes, or until a toothpick inserted into the cake comes out clean.
Cool before frosting.


Champagne Buttercream:

3 1/4 cups powdered sugar
1 cup unsalted butter room temperature
1/2 teaspoon vanilla
pinch of salt
3 Tablespoons champagne.(If frosting is to stiff add additional champagne one tablespoon at a time)

With an electric mixer beat together sugar, butter and salt. Add champagne and vanilla, beating until light and fluffy. (I beat my buttercream for 5-8 minutes)
Wishing you the peace of God in the coming year.

Friday, December 2, 2011

Gift Card Cookies


One of our most cherished Christmas traditions at Mimi's Kitchen is our Christmas Eve festivities. We are invited to Boy Mimi's God Parents house for an evening of feasting and fun. The evening always starts with an incredible meal, featuring Mrs. A's famous meatballs. It's a secret recipe, which even I don't have, but I do know that the meatballs are browned and then simmered in cream, making them the most delicious meatballs I have ever had. Boy Mimi loves these meatballs and has been known to consume massive quantities, so he has become the official meatball assistant. He heads over the day before the party to help Mrs A. with the meatball production. I always quiz him on what is in the recipe when he gets home, but all he ever says is, "Meat, of course!" So it still remains a secret, but even if we do discover the recipe, they will never be as good as they are at Mrs. A's on Christmas Eve. 


Besides our meal, we sing carols, play Christmas trivia games, and have a gift exchange. The evening ends with everyone heading off to church for the midnight Christmas Eve service. As our families have grown and kids have married, our group has expanded to include in-laws, boyfriends and girlfriends, and assorted relatives. We wanted everyone to be able to participate in gift giving, and since it is pretty hard to buy thoughtful gifts for people you don't know all that well, we have modified our gift exchange into a gift card exchange. What makes this a little more special than just handing out cards is the way we "wrap" our gift cards. So not only do you get a gift card, but a fun little gift as well. The packaging is a clue to the store; sometimes the clues are easy to guess, while others leave us stumped, but intrigued as to what is under the exterior.  Mrs. A's family is crafty as they come (check out her daughter's own blog in words and pictures if you want proof!)  in the past we have had all of these things under the tree: a picture frame with Prince William PhotoShopped into some vineyards, (Williams-Sonoma), a Michael Buble CD (Michael's craft store), an eye patch with a tuning fork (iTunes), a jigsaw puzzle of a barn (Barnes and Noble), and a barrel of monkeys inside a crate (Crate and Barrel).
 As soon as we walk in the door, we begin checking out the wrapped cards, trying to figure it out while we eat and sing, waiting for the exchange so we can see if we guessed the gift cards correctly. 

Since we express our creativity in the form of baking here at Mimi's Kitchen, we decided to make gift card cookie clues. We have done red glittery stars for Macy's, red and white bull's eyes for Target, Hibiscus flowers for Trader Joe's and biscotti for Starbucks. These make good hints as to what is in the package, and the recipient gets a tasty snack. We haven't decided what gift cards we will be bringing this year, but we do know that our clues will be edible!

sugar cookies


Links: Foodie Friday

Thursday, November 17, 2011

Pumpkin Parfait with Brown Sugar Crumble and Bourbon Cream


Hard to believe, but it's already time for the November Improv cooking challenge. Sheryl at The Lady Behind The Curtain is no longer able to organize this group so Kristen at Frugal Antic of a Harried Homemaker has taken over hosting the challenge. The November ingredients were cream cheese and pumpkin. We choose to make a parfait using pumpkin pie as our inspiration. It has the same flavors as pie, but is super easy to make and there is no pie crust to roll out. A light and creamy pumpkin cream cheese filling is layered with a brown sugar crumble and topped with a bourbon spiked whipped cream. We layered it in small individual serving dishes, starting with some crumble on the bottom of the dish followed by a layer of pumpkin filling, then a spoonful of bourbon cream on top, and more brown sugar crumble sprinkled over the whipped cream. We liked that this dessert was a new twist on a classic, but still had the familiar flavors that everyone expects at a Thanksgiving dinner. 


We used both individual small dishes and mini two-bite sized serving dishes but you could easily make it as one big dessert in a pie dish or a small trifle dish. The individual parts can all be made several days ahead, but save assembly for the day before serving so the crumble stays crunchy.

Pumpkin Parfait with Brown Sugar Crumble and Bourbon Whipped Cream

Brown Sugar crumble
1/2 cup flour
 3  tablespoons brown sugar
1/2 teaspoon ground ginger
1/4 teaspoon salt
1/4 cup melted butter
In a medium bowl mix together dry ingredients. Add melted butter and stir with a fork or your fingers until well mixed.
Crumble mixture on a baking sheet and bake in a 350 degree oven for about 15 minutes total. After the initial 8 minutes stir the mixture to break up clumps and continue baking until golden brown. Remove from oven and stir to break up any big clumps. Let cool.

Pumpkin Cream Cheese Filling


8 oz cream cheese
½ cup pumpkin puree
½ cup sugar
1 tablespoon molasses
½ teaspoon cinnamon
¼ teaspoon ginger
¼ teaspoon allspice
1 cup whipping cream

Whip cream with 2  tablespoon of the sugar. Set aside Whip the cream cheese until smooth. Add remaining sugar, pumpkin, molasses, cinnamon, ginger and allspice. Beat with paddle for about five minutes, scraping down the side as needed, until light and fluffy. Fold in the whipped cream.

Bourbon Whipped Cream
1 1/2 cups heavy cream
1/3 cup sugar
2-3 tablespoons bourbon or brandy (or omit and add 1 teaspoon vanilla)

In a chilled bowl beat the cream, sugar and flavoring until semi firm peaks form.

Assembly:
In the bottom of your serving dish(s) sprinkle a layer of brown sugar crumble, follow with a layer of pumpkin filling, and top with whipped cream and sprinkle the top with crumble. You can also make several thinner layers alternating the crumble and filling if you would like. Chill until serving time.

printable recipe

Link: Foodie Friday at Designs by Gollum

Thursday, November 10, 2011

Bourbon Balls and Cookbook Review


When I was a child, Bourbon Balls were the Adults Only dessert craze. We children were not allowed to eat them.  My mom would make them just after Thanksgiving and let them age until Christmas. When I did finally taste one, the alcohol flavor was so strong that I spit out my first bite and haven't given them much thought since. When I received the Little Old Lady Recipes-Comfort Food and Kitchen Table Wisdom cookbook to review, I found the recipe for bourbon balls, so I thought this was my opportunity to give them another chance.


The recipe is slightly different that my mom's. It uses honey instead of Karo syrup for the sweetener and I think this is a delicious change. Also, I didn't add the full 1/4 cup of bourbon. I just used enough to make a moist dough and used bourbon that had had a vanilla bean soaking in it. Our balls turned out to be a little drier than the ones Mr. Mimi remembered, but he still liked the flavor and ate several for the sake of an accurate review.  If you like a softer cookie, use the entire amount of bourbon.


Little Old Lady Recipes, written by Meg Faverau and published by Quirk Books (quirkbooks.com, available at Amazon.com), is full of comfort food recipes, along with photos and kitchen wisdom of the ladies who contributed recipes to the book. There are plenty of comfort food recipes, including Irish soda bread, chicken and dumplings, meat loaf, fried chicken and rhubarb pie. The recipes are written just as if your grandmother scribbled it on a recipe card, direct and to the point, often assuming that you have some kitchen knowledge (or have watched her make the recipe hundreds of times). Sprinkled in among the recipes are tips from the cooks, ladies with lots of life experience and even more advice. One of our favorites was "There isn't much a good cake won't fix". You can't go wrong with a motto like that! 


Bourbon Balls
1 cup toasted chopped pecans
1 1/2 cup crushed vanilla wafer cookies
3/4 cup powdered sugar
2 tablespoons cocoa powder
2 tablespoon honey
1/4 cup Bourbon
additional powdered sugar for rolling.

1. Combine the first four ingredients in a bowl and then add honey and bourbon; stir. Form into balls with your hands and roll in powdered sugar. Refrigerate before serving. Makes approximately 48 balls. (I got closer to 36 balls)


links: Foodie Fridays at Designs by Gollum

Thursday, November 3, 2011

Thanksgiving Bread


Traditions abound here at Mimi's Kitchen throughout the year, but some of our favorites come during the fall holidays, and this beautiful braided bread is one of them. Years ago I went to a bread baking class just for fun at a local adult school and the teacher gave us her Thanksgiving bread recipe. It's a lovely golden color, which it gets from either winter squash or pumpkin. The pumpkin/squash keeps it moist, but doesn't impart too much flavor. What I like about the recipe is that it makes one very large loaf for a crowd, or you can make 2 smaller loaves, which would be perfect for sharing with friends or neighbors for their Thanksgiving table.
If you have leftovers this makes excellent french toast, turkey sandwiches or even bread pudding. It is a perfect way to infuse some fall flavor and color into your meal throughout the season.
Squash Bread
makes 2 loaves

2 tablespoons yeast
3/4 cup warm water
1 1/4 cup pumpkin or orange squash puree
1 1/2 teaspoon salt
1/3 cup brown sugar
1 cup milk
1/3 cup soft butter
1 egg
5 1/2 cups flour

1. Dissolve yeast in warm water. Add a pinch of sugar and let stand until bubbly.
2. Combine pumpkin, milk, sugar, butter, egg and salt in a large bowl.  Add the yeast mixture and stir to incorporate.You can use your stand mixer for this.
3. Add add 4 3/4 cup flour and stir to make a smooth dough.
4.  Turn dough on a lightly floured surface and knead(about 10 minutes by hand or 5-7 minutes in mixer with a dough hook), adding remaining flour as necessary to create a dough that is smooth and silky. Dough should not be tacky. 

 5. Place dough in a greased bowl (I spray them with PAM) cover with plastic wrap and let rise until double in size about 1  1/2 hours.

6. Punch dough down and shape.

If making two loaves divide the dough in half. Each half is then divided into thirds. Shape each third into a 14 inch rope.  On a baking sheet lined with a silpat braid your 3 ropes into one loaf (I cross them in the center of the ropes and braid to the ends)
Cover with plastic wrap and let rise until double in size.
Bake in a 375 degree oven until golden (about 20-30 minutes depending on the size of your loaf.
When bread comes out of the oven and is still warm, brush the crust with soft butter. 
Cool completely on a wire rack.
printable recipe


links: Foodie Fridays at Designs by Gollum

Wednesday, October 26, 2011

Butterfinger Bites

Mini Me has been away at school for almost two months, so it's time to to get that mid-term care package in the mail. One of our shared loves is peanut butter, so I always try to include a peanut-y treat in her box. I've been seeing home made butterfinger bars all over the internet, and knowing they are a favorite of Mini Me,  I thought I'd give them a try. Looking at the simple, and strange, ingredients, I wasn't quite sure what these would be like. I must admit, I was surprised at how good these were. They don't have that hard snap that butterfingers do, but they sure had the flavor and texture of the soft crumbly part. If you are not a candy corn lover, this is the perfect recipe to re-purpose  candy corn that finds its way to your house on Halloween!
For these tasty little treats, you only need three ingredients that you probably already have on hand, making these even easier to put together.

Butterfinger Bites
1 lb Brach's candy corn
1 lb peanut butter
1 lb chocolate

Directions:
In a mircowave safe bowl melt the candy corn, stiring every 15 seconds until melted.  The melted candy will not be fluid and flow, but be grainy and somewhat lumpy.
Add the peanut butter and stir until completely mixed. Pour into a 9x9 parchment lined pan. Pat down firmly into an even layer. I used an offset spatula to smooth the surface. Allow to cool, cut in to desired size (I cut mine in about 1 inch squares) dip in melted chocolate and let harden on a parchment lined cookie sheet. Enjoy!


Link:Foodie Friday at Deisgns by Gollum

Thursday, October 20, 2011

Caramel Apple Cream Cheese Mousse


When I started Mimi's Kitchen, I found that joining cooking and baking groups was a good way to get going. I made new friends from some fabulous blogs, found lots of new recipes, and am still learning tips and improving upon my food photography. However, after a while, I realized that I was essentially just looking at hundreds of the same cupcakes, cookies, or ice cream each week as everyone from the group posts the same recipe. It is always interesting to see other peoples' pictures and read about recipe problems/suggestions, but not super exciting as far as variety goes. Sometime in September Sheryl invited me to participate in The Improv Cooking Challenge, which is a monthly ingredient-based challenge created by Sheryl at The Lady Behind the Curtain. Each month, Sheryl selects two ingredients and each participant comes up with a recipe using those ingredients. To learn more about the challenge head on over Sheryl's blog. For October, she challenged everyone to use apples and caramel to create a unique and tasty dish.


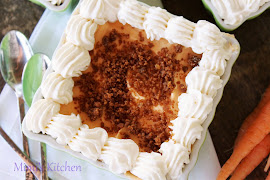
We decided to put several things we love into one recipe- apples, caramel, cheesecake, and mousse. Each part of this dessert is easy to make and delicious on its own, but when combined they make a spectacular autumn dessert. We borrowed from several recipes that we enjoy; from the Daring Bakers' Tian recipe, we borrowed both the technique and sable cookie base. From Julia Child's The Way to Cook, we used the baked apples and caramel sauce. The filling was our take on a cream cheese mousse, which was cream cheese whipped until light and fluffy and lightened even further by folding in whipped cream. A swirl of caramel sauce brings it all together. The assembly follows the tian method, by layering the dessert upside down in either a ring mold or 6 wells of a removable bottom muffin tin. This is a great dessert for parties, because it can all be made a day a head of time, and has a beautiful plated presentation.


Sable Cookies

Ingredients: 
2 medium-sized egg yolks at room temperature
6 tablespoons  granulated sugar 
½ teaspoon vanilla extract
3.5 oz unsalted butter
1/2 teaspoon Salt
1.5 cup + 2 tablespoons All-purpose flour (7 oz)
1 teaspoon baking powder

Directions:
Put the flour, baking powder, ice cold cubed butter and salt in a food processor fitted with a steel blade. Pulse until the butter is in pea sized chunks.

In a separate bowl, add the eggs yolks, vanilla extract and sugar and beat with a whisk until the mixture is pale. Pour the egg mixture in the food processor.

Process until the dough just comes together. If you find that the dough is still a little too crumbly to come together, add a couple drops of water and process again to form a homogeneous ball of dough. Form into a disc, cover with plastic wrap and leave to rest in the fridge for 30 minutes.

Preheat your oven to 350 degree Fahrenheit.

Roll out the dough onto a lightly floured surface until you obtain a ¼ inch thick circle.
Using your cookie cutter the same size as your mold, cut out cookies and place on a parchment (or silicone) lined baking sheet. Bake for 20 minutes or until the cookies are just golden.


Oven Baked Apple Slices
via Julia Child's The Way To Cook

3 pounds apples, any kind that holds their shape when cooked in slices (I use golden delicious, granny smith, and gala)
1 /4 cup sugar blended with 1/4 teaspoon cinnamon
1 Tablespoon lemon juice
4 Tablespoons butter, melted.

Pre heat the oven to 375degrees F.
Peel, core, and slice apples. They should be 1/2 inch wide at the outside edge. Toss in a bowl first with the sugar mixture, then with the lemon juice and finally with the melted butter. Let sit 3-4 minutes to render juices and absorb flavor. Taste, and fold in a little more sugar if needed.

Turn apples into a greased 9x13 baking dish and bake in the middle level of the oven for 30 to 40 minutes, basting occasionally, until the apples slices are thoroughly tender, but hold their shape; they should color lightly and juice should have reduced to a thick syrup.
If the juices have not reduced pour them off in a small saucepan and boil down to a thick syrup and pour back over the apples.


Caramel Sauce
via Julia Child's The Way To Cook 

1 cup sugar
1/3 cup water
1 cup cream
2 tsp vanilla
Pinch of salt


Blend the sugar and water in a 1 ½ qt sauce pan and bring to a simmer, brushing the sugar from the sides of the pan with a pastry brush and water.  Remove from heat and swirl the pan by the handle to make sure all of the sugar has dissolved and the liquid is perfectly clear. Return pan to moderately high heat; cover and boil for several minutes. After a minute or so peek at syrup, when the bubbles are thick uncover the pan.


Continue boiling, swirling the pan by the handle until the syrup begins to color. When it is a light caramel color remove from the heat and continue swirling and the color will darken more. To stop cooking place bottom of the pan in cool water.

Slowly add the cream, which will congeal the caramel. Return pan to low heat and simmer, stirring until the caramel dissolves. Remove from heat; stir in vanilla and salt. Use warm or cooled. Refrigerated in a covered jar, the sauce will keep for weeks.


Cream Cheese Mousse

6 oz cream cheese
1/4 cup plus 1 tablespoon sugar
1 1/2 cups whipping cream
1/3 to 1/2 cup caramel sauce
1 teaspoon vanilla

In a medium bowl whip the cream to soft peaks with 1 tablespoon sugar and the vanilla. Set aside.
Whip the cream cheese and remaining sugar until light and fluffy. Gently fold in the whipped cream until thoroughly incorporated. Drizzle the caramel sauce over the mixture and fold in, leaving streaks of caramel in the mixture.

Assembling the Dessert:

Make sure you have some room in your freezer.
Line a small tray or baking sheet with parchment paper or a silicone sheet. Lay out 6 ring molds  onto the parchment paper/silicone. I used a 6 well removable bottom muffin tin.Have the apples, cream cheese mixture, and baked cookies ready to use.

Arrange the apple slices at the bottom of each mold. Make sure the segments all touch either and that there are no gaps. Make sure they fit snuggly and look pretty as they will end up being the top of the dessert.

Once you have neatly arranged one layer of apple slices at the bottom of each mold, add a couple spoonfuls of cream cheese and gently spread it so that it fills the mold in an even layer. Leave about 1/2 inch at the top so there is room for apples and the cookie. Carefully add a layer of apples and place a cookie over each mold . Gently press on the cookie to make sure the dessert is compact.
Place the desserts to set in the freezer to set for at least 10 minutes, or up to 2 days.
Using a small knife, gently go around the edges of the mold to make sure the dessert will be easy to unmold. Gently place your serving plate on top of a dessert (on top of the cookie) and turn the plate over. Gently remove the ring mold. When using the tin after running the knife around the edge, just push up from the bottom and invert on to your serving plate.If frozen alllow to come to room temperature before topping with remaining  caramel sauce and a dollop of whipped cream.
Thank You Sheryl for putting together The Improv Cooking Challenge. We are looking forward to November's challenge! 


Links: Foodie Fridays at Designs by Gollum

Tuesday, October 4, 2011

Mummy Cupakes


 In the fall I can't get enough of pumpkin. We make pumpkin bread, cupcakes, mousse, and cheesecakes, to name a few. When a friend needed something for her bake sale, I knew I was going to make pumpkin cupcakes, but I was still searching for a fun decoration idea. While searching for Halloween themes, I saw these mummy cupcakes, and decided to give them a try. I started with a simple pumpkin cupcake, used my favorite white butter cream frosting for the bandages, and red and green gummy worms for the eyes and mouth, with a black non-peril for detail. 
The pumpkin cupcakes were soft, moist, and full of the flavors of fall. Make sure not to fill them too full before baking- you want them to bake with a flat top instead of a dome. If it does puff up, just use a serrated knife to cut a flat top, and use a crumb coat to keep everything neat. The assembly of the mummy itself is pretty easy. First, frost the top of the cup cake in a thin layer of white. Cut the red gummy worms in 1/2 or 1/3's and cut the green gummy worm in to 1/2 inch pieces. Place a segment of a red gummy worm on the cupcake for the mouth and place the green gummy worms cut side up where you want the eyes, add the non-peril to the center of the eye. Then have at it creating bandages in random strips all over the top of the cupcake. There is no right or wrong pattern, just layer and cross them as you go. I used a #47 tip (the one used for basket weave). The back side of the tip is smooth so turn the teeth side down and you have smooth even strips for bandages. These were tasty and quick to make, and a big hit at the bake sale. They would make a great addition to any Halloween party, or a fun kid-friendly project for a rainy day!

Pumpkin Cupcakes
Makes 9 cupcakes

1 cup All Purpose Four
¼ tsp baking soda
1 tsp. baking powder
1 tsp ground ginger
½ tsp salt
½ tsp cinnamon
¼ tsp ground nutmeg
Pinch cloves
2.5 oz unsalted butter, room temperature
2/3 cup light brown sugar
1 egg
1/3 cup buttermilk
1/3 cup canned pumpkin puree
 1.In small bowl whisk together flour, baking soda, baking powder, salt and spices. Set aside.
2.Cream together butter and sugar until light and fluffy with an electric mixer. 3.Add the egg and continue beating until incorporated. Add pumpkin puree and mix well. Add the flour mixture in 3 batches, alternating with 2 additions of buttermilk. Mix well; batter will be fluffy.
4.Scoop batter into prepared muffin tins. Bake at 350 for 15-18 minutes until golden. Let cool completely before frosting.
Printable Recipe

American Butter Cream Frosting

1 cup softened butter
2 teaspoons vanilla
1/4 cup milk
pinch of salt
4 cups of sifted powdered sugar
Color as desired

1. Cream the butter and slowly add powdered sugar and beat until fairly well incorporated, mixture will be crumbly.
2.Add milk and vanilla beat at medium-low speed until combined and then up your speed to med-high and beat until light and fluffy.
printable recipe


Links: These Chicks Cook
Foodie Friday at Designs by Gollum

Tuesday, September 27, 2011

Baked Oatmeal

Fall comes to subtly to Southern California. Summer lingers as long as possible, however, come September, our days are warm but the mornings and evenings have a nice chill to the air. While we enjoyed quick bowls of cereal and ice cold smoothies for breakfast during the summer, it is time to shift to warm, hearty fall breakfasts.

This baked oatmeal is a perfect breakfast for the upcoming autumn mornings. Hearty oats, fruit, and nuts combine to make a tasty and pretty healthy start to your day. We like to sprinkle brown sugar on our oatmeal, so we topped ours with a brown sugar streusel before baking so you don't need to add anything but some milk or cream if you like. The leftovers do reheat well for an easy breakfast you can make once and eat all week although we definitely liked the leftovers much better with that drizzle of milk or cream.
   
Of course, once we hit on a good basic recipe, we start planning all the variations we would like to try. Apples and cinnamon came to mind for an "apple pie" oatmeal, perfect since it's almost apple season. We all like peanut butter on our oats and will definitely try swirling in some peanut butter before baking one morning. Although summer is just about over, a version full of fresh peaches and berries would be delicious, and Boy Mimi (one of the coconut lovers) suggested some toasted coconut, chopped fresh mango and a dollop of vanilla yogurt on top for a tropical version. The choices are endless, and this easy breakfast will be making many appearances on our table year round.

Baked Oatmeal

3/4 cup rolled oats
1/2 cup walnuts or pecans, chopped and lightly toasted
1/2 teaspoon baking powder
3/4 teaspoon ground cinnamon
1/4 teaspoon salt
1/4 cup maple syrup, plus more for serving
1 cup milk
1 large egg
1 tablespoons unsalted butter, melted and cooled slightly
1 teaspoon vanilla extract
2 ripe bananas, sliced into 1/2-inch thick pieces
¾ to 1 cup fresh or frozen blueberries
**you can use any combination of fruits that you like, just put some on bottom and some on the top to distribute evenly**

Streusel Topping

1/2 cup brown sugar
4 tablespoons butter, cold, cut into small pieces
1/2 cup flour
generous ¾ teaspoon cinnamon
pinch salt
 

Mix all ingredients together in a bowl or food processor until it is the texture of coasre meal. Store in the refrigerator so the butter stays cold.


1. Preheat oven to 375 degrees. Make streusel and put in refrigerator.
2. Grease or spray a 1 and 1/2-quart casserole dish with either butter or cooking spray.
3. In a medium bowl, toss together the oats, half of the nuts, the baking powder, cinnamon, and salt.
4. In a separate small bowl, mix together the maple syrup, milk, egg, melted butter, and the vanilla.
5. Place the sliced banana pieces in a single layer in the bottom of the prepared casserole dish.
6. Sprinkle about two-thirds of the blueberries over the top of the bananas, then cover the blueberries with the oat mixture.
7. Drizzle the milk mixture over the oats, making sure to distribute the milk as evenly as possible.
8.  Sprinkle the remaining blueberries over the top of the oats followed by the streusel topping.
9.  Bake the oatmeal for 35-40  min, until the top is golden brown and the oats are almost set, but slightly soft in the center. They will continue to firm up as they cool, and still be creamy. 
Printable recipe

 
Links:
This Chick Cooks
Foodie Friday  at Designs by Gollum