Wednesday, March 31, 2010

Easter Hat Cookies


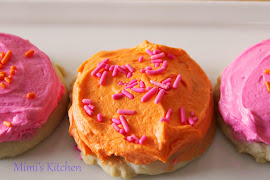
Easter bonnets are quintessentially Easter.  When I was a small girl, getting a new Easter hat was a big part of Easter for my mom, my sisters and me. Some how though, through the years we changed from wearing Easter hats to eating them.

  Many, many  years ago  in the William Sonoma catalog I saw Easter bonnet cookies, a round sugar cookies decorated as an Easter bonnet. I admired those cookies and I thought they were pretty expensive, so I decided to make my own.  The hat brim is a crispy lemon sugar cookie and the crown is a piece of  marzipan covered in  poured fondant and decorated with icing ribbons and flowers. Both the fondant and marzipan recipes are from the Cake Bible by Rose Levy Beranbaum.  These cute little hats  have become an Easter tradition for our family and friends.

I won't lie and tell you they are easy to make. It is difficult to work with poured fondant. Keeping it thin enough to flow around the cookies before it cools and hardens can be tricky. But the end result is well worth the time spent. 

Hat Cookies
 ¾ cup butter
1 ¼ cup sugar
1 egg
1 egg yolk
1 teaspoon vanilla
1 teaspoon grated lemon find
3 cups AP flour
¼ teaspoon salt.

Beat butter until soft. Gradually and the sugar and blend until light and creamy. Beat in the eggs, vanilla and lemon rind.
Sift flour and salt together. Stir the flour gradually into the butter mixture until well blended. The last of the flour may have to be kneaded in by hand. Chill the dough for several hours.
Preheat the oven to 400 F. Roll the dough very thin and cut cookies using the 3 in round scalloped edge cutter. I use a sleeve on my rolling pin to keep the dough from sticking Place on silpat covered sheet and bake about 8 minutes.

Poured fondant
Cake Bible
2 1/2 cups sugar
1/2 cup water
1/4 cup corn syrup
optional 1 tsp.vanilla or 1/4 tsp. almond extract

Food Processor
In a medium heavy saucepan combine sugar, water, and corn syrup. Bring to a boil stirring constantly. Stop stirring and allow the syrup to cook to the soft -ball stage (238F).  Immediately pour syrup into the food processor.
Allow the syrup to cool to exactly 140F. About 25 to 35 minutes.Set a timer  Add the optional flavoring and process for 2 to 3 minutes or until the fondant becomes opaque.  Pour the fondant into a heatproof container, such as a 2cup glass measuring cup lined with a small heavy-duty plastic freezer bag. Close bag without sealing.  When completely cool and firm, expel the air, seal bag, remove from container. Store at room temperature for at least 24hours.


Marzipan
Cake Bible
7 ounces almond paste
3.5 ounces poured fondant flavored with almond extract (1/3 cup)
1/2 - 1 cup powdered sugar

Combine all ingredients in a food processor and process for a few seconds until blended. The marzipan will be in pieces  dump it onto a counter and knead until smooth.Wrap air tight and allow to rest 1 hour.


Royal Icing

2 tablespoons mergaine powder
4 tablespoon water
2 2/3 cup powdered sugar.
Combine all ingredients in the bowl of stand mixer. Beat until light and fluffy about 6 to 8 minutes. Scrape sides of bowl as necessary.


To assemble cookies:
Make a simple syrup : bring to a boil 1 cup of suagr with 1/2 cup water. As soon a the mixture boils remove form heat, pour into a heat proof cup.
Roll marzipan in to a log, with a diameter slightly smaller than size of a quarter.  Slice long into 3/8 inch slices. flatted slightly and round edges so the fondant slides over them.
Place each  marzipan crown  in the center of a cookie.
In a double boiler melt a small amount of the fondant with about 1 tablespoon of simple syrup. Once melted remove the double boiler  from  the heat but keep the fondant over the hot water. Color with gel colors to the desired color.  Add simple syrup a little at a time until fondant is thin enough to pour over cookies. If the fondant gets to cool and thick return pan to the heat for a minute or two.
Working quickly, spoon fondant over the cookie, starting in the center and working your way around the cookie. It takes practice to get a smooth even layer.
Allow the fondant to cool and harden for several hours or over night.
Decorate with royal icing.
printable recipe


Happy Easter!

Saturday, March 27, 2010

Daring Bakers Orange Tian

Orange Tian

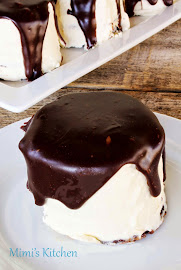
 The 2010 March Daring Baker’s challenge was hosted by Jennifer of Chocolate Shavings. She chose Orange Tian as the challenge for this month, a dessert based on a recipe from Alain Ducasse’s Cooking School in Paris. A tian is simple elegant layered dessert. A delicate  shortbread crust covered with marmalade, a fruity stabilized whipped cream,  and fruit pieces topped with a  caramel sauce.

The mandatory steps were: tart dough, caramel sauce, marmalade, stabilized whipped cream with marmalade folded in we also added a dash of triple sec to the cream to boost the citrus flavor,  and fruit pieces. Each step by itself was not difficult and the end result was greater than the sum of the parts. The secret to this recipe is that it is assembled upside down. The tart dough is cut  and baked into individual cookies the size of your mold. The fruit is marinated in caramel sauce than placed in the mold and covered with the whipped cream layer.   Marmalade is spread on ones side of cookie crust, than placed in the mold marmalade side to the cream. Place in the freezer to set. Serve with a drizzle of caramel sauce.


The result is a luscious light, creamy and refreshing dessert.  Perfect for summertime when you want something cool and fruity.  Of course you don't have to limit your fruit to citrus. Almost any fruit would be a winner.  I not sure that marinating the fruit in the caramel sauce did anything to enhance the flavor and I would probably omit this step in the future, except for fruits that oxidize (bananas, peaches and apples) with air contact. One other important step is to leave your tian in the freezer long enough to set the dessert so you can unmold it cleanly. Once unmolded store in the refrigerator, so the fruit doesn't freeze to hard chunks.
 
Orange Tian
Pate Sablee
2 egg yolks
2.8 oz (6TB) Sugar
1 tsp vanilla
1/4c plus 3 tbs.(3.5oz) butter
7oz (1 1/2c+2tbs) AP flour
1tsp baking powder
½ tsp salt
 1. Put the flour, baking powder, ice cold cubed butter and salt in a food processor fitted with a steel blade.
2. In a separate bowl, add the eggs yolks, vanilla extract and sugar and beat with a whisk until the mixture is pale. Pour the egg mixture in the food processor.
3. Process until the dough just comes together. If you find that the dough is still a little too crumbly to come together, add a couple drops of water and process again to form a homogeneous ball of dough. Form into a disc, cover with plastic wrap and leave to rest in the fridge for 30 minutes.
4. Preheat your oven to 350 degree Fahrenheit.
5. Roll out the dough onto a lightly floured surface until you obtain a ¼ inch thick circle.
6. Using your cookie cutter, cut out circles of dough and place on a parchment (or silicone) lined baking sheet. Bake for 20 minutes or until the circles of dough are just golden.
 Orange Marmalade
3.5oz (1/4c.+3TBS) orange juice
1 large orange cut into slices
Cold water enough to orange slice
5 grams pectin
Sugar  same weight as oranges after they are cooked
8 large oranges for segments
1. Finely slice the orange. Place the orange slices in a medium-sized pot filled with cold water. Simmer for about 10 minutes, discard the water, re-fill with cold water and blanch the oranges for another 10 minutes.
2. Blanch the orange slices 3 times. This process removes the bitterness from the orange peel, so it is essential to use a new batch of cold water every time when you blanch the slices.
3. Once blanched 3 times, drain the slices and let them cool.
4. Once they are cool enough to handle, finely mince them (using a knife or a food processor).
5. Weigh the slices and use the same amount of granulated sugar . If you don‘t have a scale, you can place the slices in a cup measurer and use the same amount of sugar.
6. In a pot over medium heat, add the minced orange slices, the sugar you just weighed, the orange juice and the pectin. Cook until the mixture reaches a jam consistency (10-15 minutes).
7. Transfer to a bowl, cover with plastic wrap and put in the fridge.
For the Orange Segments
1. For this step you will need 8 oranges.
2. Cut the oranges into segments over a shallow bowl and make sure to keep the juice. Add the segments to the bowl with the juice.
Caramel
1 cup sugar
14oz orange juice(1.5 cups +2Tbs)
 Directions:
1. Place the sugar in a pan on medium heat and begin heating it.
2. Once the sugar starts to bubble and foam, slowly add the orange juice. As soon as the mixture starts boiling, remove from the heat and pour half of the mixture over the orange segments.
3. Reserve the other half of the caramel mixture in a small bowl — you will use this later to spoon over the finished dessert. When the dessert is assembled and setting in the freezer, heat the kept caramel sauce in a small saucepan over low heat until it thickens and just coats the back of a spoon (about 10 minutes). You can then spoon it over the orange tians.
Cream
 1 cup heavy cream
3 tbs hot water
1 tsp gelatin
1 tbs confectioner’s sugar
1 tbs orange marmalade
 
1. In a small bowl, add the gelatin and hot water, stirring well until the gelatin dissolves. Let the gelatin cool to room temperature while you make the whipped cream.
2- Combine the cream in a chilled mixing bowl. Whip the cream using a hand mixer on low speed until the cream starts to thicken for about one minute.
3- Add the confectioner sugar. Increase the speed to medium-high. Whip the cream until the beaters leave visible (but not lasting) trails in the cream, then add the cooled gelatin slowly while beating continuously.
4- Continue whipping until the cream is light and fluffy and forms soft peaks. Transfer the whipped cream to a bowl and fold in the orange marmalade.
Assembling the Dessert:
1. Make sure you have some room in your freezer. Ideally, you should be able to fit a small baking sheet or tray of desserts to set in the freezer.
2. Line a small tray or baking sheet with parchment paper or a silicone sheet. Lay out 6 cookie cutters onto the parchment paper/silicone.
3. Drain the orange segments on a kitchen towel.
4. Have the marmalade, whipped cream and baked circles of dough ready to use.
5. Arrange the orange segments at the bottom of each cookie cutter. Make sure the segments all touch either and that there are no gaps. Make sure they fit snuggly and look pretty as they will end up being the top of the dessert. Arrange them as you would sliced apples when making an apple tart.
6. Once you have neatly arranged one layer of orange segments at the bottom of each cookie cutter, add a couple spoonfuls of whipped cream and gently spread it so that it fills the cookie cutter in an even layer. Leave about 1/4 inch at the top so there is room for dough circle.
7. Using a butter knife or small spoon, spread a small even layer of orange marmalade on each circle of dough.
8. Carefully place a circle of dough over each ring (the side of dough covered in marmalade should be the side touching the whipping cream). Gently press on the circle of dough to make sure the dessert is compact.
9. Place the desserts to set in the freezer to set for 10 minutes.
10. Using a small knife, gently go around the edges of the cookie cutter to make sure the dessert will be easy to unmold. Gently place your serving plate on top of a dessert (on top of the circle of dough) and turn the plate over. Gently remove the cookie cutter, add a spoonful of caramel sauce and serve immediately.
To see what the other Daring Bakers did visit our blogroll at The Daring Kitchen

Tuesday, March 23, 2010

TWD: Dulce de Leche Duos


TWD:  Jodie of  Beansy Loves Cake decided on Dulce de Leche Duos. A soft cakey cookies sandwiched together with a dulce de leche. I made my own dulce de leche using Alton Brown's recipe. It was the best dulce de leche that I've ever had.  So easy to make that I probably won't buy the canned variety again.

These rich and soft chewy cookies had a delicious brown sugar/caramel flavor. Although we liked the dulce de leche in the center the cookies were too big to be a sandwich cookie.  If they were smaller, a two bite cookie, that might be better. They were nice as a single cookie with a drizzle of dulce de leche, but storage became a problem since they were to sticky to stack.  Next time I would try adding toasted and chopped pecans to the batter or maybe just sprinkled on top before baking.


Thank You  Jodie for picking this cookie, I really loved the chewy texture and flavor of theses cookies, but I just feel that they are missing something, and I can't quite put my finger on it.  If you what to see what the other TWD bakers thought visit our blog roll.

Homemade Dulce de Leche
adapted from Alton Brown

1 quart whole milk
1 1/2 cups (12 ounces) granulated sugar
2 teaspoons vanilla
1/2 teaspoon baking soda

Combine the whole milk, sugar and vanilla  in a 4 quart saucepan over medium heat. When the sugar melts and the mixture starts to boil, add the baking soda and lower the heat to low until the mixture is barely simmering. Cook for an hour, stirring occasionally (don't try to incorporate the foam that forms on the top of the milk). Remove the vanilla bean and continue to cook, stirring occasionally, until the mixture is a deep caramel color and has reduced to about 1 cup, about 1 1/2 - 2 hours. Whirl in the blender and than pour through a fine mesh strainer into a measuring cup or clean container, cover and refrigerate for up to one month.
Printable Recipe

Dulce de leche duos
by Dorie Greenspan from Baking From My Home to Yours

2 1/2 cups all-purpose flour
1 t baking soda
1/2 t salt
2 sticks (8 oz) unsalted butter, at room temperature
3/4 cups store-bought dulce de leche, plus more for filling
3/4 cup packed light brown sugar
1/2 cup sugar
2 large eggs

Position the racks to divide the oven into thirds and preheat the oven 350 degrees F. Line two baking sheets with parchment or silicone mats.

Whisk together the flour, baking soda and salt.

Working with a stand mixer, preferably fitted with a paddle attachment, or with a hand mixer in a large bowl, beat the butter at medium speed until soft. Add the 3/4 cup of dulce de leche and both sugars and continue to beat until light and fluffy, about 3 minutes. Add the eggs one at a time, beating for 1 minute after each addition. Don’t be concerned if the mixture looks a little curdled- it will smooth out when the flour mixture goes in. Reduce the mixer speed to low and add the dry ingredients, mixing only until they disappear into the batter. Spoon the dough onto the baking sheets, using a heaping teaspoon of dough for each cookie and leaving 2 inches between them. Bake the cookies 10 to 12 minutes, rotating the pans from top to bottom and front the back at the midway point. The cookies should be honey brown with a light sugar crust, but they will still be soft, so remove the sheets from the oven but don’t touch the cookies for another minute or two. Then, using a wide metal spatula, transfer the cookies to a rack to cool to room temperature. Repeat with the remaining dough, making sure you cool the baking sheets before spooning the dough onto them. When the cookies are completely cool, spread the flat bottoms of half the cookies with a small amount of dulce de leche, and sandwich with the flat sides of the remaining cookies.
Makes about 30 sandwich cookies

Thursday, March 18, 2010

Tangerine Frozen Yogurt


Hot days call for a refreshing treat. Since  I had a few tangerines still lingering on my tree and I  have that new ice cream machine I made tangerine frozen yogurt. It's really doesn't get any easier than this.  You could use any fruit juice or puree you like. 

Tangerine Frozen Yogurt

1 1/2 cup Tangerine juice
1 cup yogurt ( I used Greek)
1 cup  milk( I used non fat)
1/2 to 1 cup sugar - to taste

Mix all together . If needed add a splash of lemon juice to your fruit to perk up the flavor. With fruits that oxidize such as peaches use lemon to prevent color change.
Freeze in you ice cream machine according manufacturer's instructions.
printable recipe


Sunday, March 14, 2010

Guinness Chocolate Mousse

A salute to the Irish

When my children were small we celebrated every special day from Ground Hog's Day to Veteran's day  with a special meal or treat.  The idea was that we would be groundhogs, veterans or Irish for the day. On Ground Hog's Day, we had  trail mix of nuts and dried fruit, something a groundhog  might store in his burrow. On Veteran's day we had chipped beef on toast, something my father, a veteran of World War II, remembered eating while in the Navy. On St Patrick's Day  we had colcannon, boxty,  Irish stew and Irish soda bread.  But what could be more Irish than a mug of Guinness? 

A shot of Guinness Chocolate Mousse

Guinness is definitely an acquired taste one that, as a beverage, has eluded both Mr. Mimi and myself.  The recipe for the Guinness Chocolate Mousse appeared in our local news paper several years ago.  Smooth, creamy and slightly bitter chocolate mousse topped with a  sweet white chocolate mousse .  It is the perfect way to have your Guinness and be Irish for the day.

Black and White Chocolate Mousse
adapted from San Diego Union Tribune

Black Chocolate Mousse
8 oz semisweet or bittersweet chocolate chopped
4 oz unsalted butter
1/4 cup sugar
Pinch of salt
3/4 cup Guinness stout
3 large eggs separated
1 cup heavy cream

White Chocolate Mouse
6 oz white chocolate chopped
1 cup heavy cream

Black Chocolate Mousse:
In top of double boiler heat chocolate, butter salt and sugar.  Stir until the chocolate has melted and the mixture is smooth. Stir in the Guinness and then whisk in the egg yolks one at a time. Continue stirring over heat for 2 minutes.
Remove chocolate mixture from heat and allow to cool to room temperature. I put mine in an ice water bath to speed up the cooling.
In a small bowl whip the cream until soft peaks form.  Fold  whipped cream into the chocolate mixture. With clean beater beat egg whites until stiff peaks form.  Fold the egg whites into the chocolate mixture. Fill individual serving dishes 3/4 full with the chocolate mousse and refrigerate.

White Chocolate Mousse
Melt white chocolate and 1/2 cup cream, in a small sauce pan or in the microwave. Stir until the chocolate is completely melted. Let cool to room temperature about 30 minutes.  Beat reaming cream until stiff peaks form and fold into the white chocolate mixture.  spoon mixture over the top of the chocolate mousse and refrigerate for at least 2 hours or over night.


Thursday, March 11, 2010

Tres Leches Cake


Where I live in Southern California  we are lucky to be 20 minutes from the beach, an hour or so from the mountains and about 2 hours from the desert. If we want mountains with enough snow to ski on we do need to travel a bit farther.
 Last weekend we took a short camping trip to the  desert. After weeks of rainy weather the desert was green and the plants were just beginning to blossom. Hard to believe but on our on trip home, we had to drive through  snow flurries.


 Late winter and early spring shows the desert at it's finest,  the Ocotillos  on the left are starting to bloom.

Ocotillo blossom
On this  trip I was assigned dessert for Saturday night's dinner.  I needed a dessert that would travel well and stay moist in the dry desert air. I had been wanting to make a tres leches cake for sometime, but the  traditional whipped cream topping wasn't going to make it on a camping trip. Teanna at  Spork or Foon,  posted a tres leches cake which she topped with dulce de leche.  This seemed like the perfect choice. I shopped around for a recipe that would work for me and found one at the Food Network.  I have made some changes to the original  recipe and my version appears below.

Tres Leches Cake
adapted from Food Network
Ingredients
1 tablespoon vegetable shortening
2 cups plus 1 tablespoon all-purpose flour, divided
6 large eggs, separated
2 cups granulated sugar
2 teaspoons baking powder
1/2 cup whole milk
1 1/4 teaspoons vanilla extract, divided
1 (12-ounce) can evaporated milk
1 (14-ounce) cans sweetened condensed milk
1 cup heavy cream, divided
1 can Dulce de Leche

Directions

  1.  Position rack in bottom 1/3 of oven and preheat the oven to 350 degrees F.
  2. Lightly grease a 13 by 9-inch baking pan with the shortening. Add 1 tablespoon of the flour to the greased pan and shake it around to coat the entire pan with the flour. Shake out excess flour. Set aside.
  3. In the bowl of an electric mixer fitted with a whisk attachment, beat the egg whites on medium speed until soft peaks form. Reduce the speed to low and gradually add the sugar with the mixer running, beating until stiff peaks form.
  4. Add the egg yolks, 1 at a time, beating well after each egg is added.
  5. In a small mixing bowl, sift together the 2 cups flour and baking powder. Add the flour mixture to the batter in stages, alternating with the whole milk, beginning and ending with the flour. (Do this quickly so that the batter does not lose its volume.) Add 1 teaspoon of the vanilla extract. Pour the batter into the prepared pan and place in the oven.
  6. Bake for 25 to 30 minutes, until a toothpick inserted into the center comes out clean. Remove the cake from the oven and place on a wire rack to cool for 10 minutes.
  7. Combine the evaporated milk, sweetened condensed milk, and 2/3 cups of the heavy cream.
  8.  Pour 1/2 of the  milk mixture over the warm cake.
  9. When the cake has soaked up most of the liquid, pour the remaining half of the milk mixture over the cake, and cool to room temperature.
  10. Mix remaining cream with dulce de leche. Spread over milk soak cake, cover and refrigerate until well chilled, at least 4 hours or overnight.


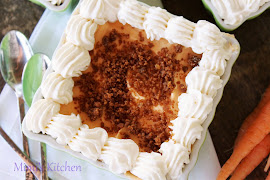
This cake was moist without being soggy. When served cold, the texture was firm, but at room temperature it softened up and became creamy.  This is a cake that you could easily change the flavor of by adding citrus zest to both the cake batter and the soaking milk  or by replacing some of the milk with  fruit juice, Kahlua, Framboise or Grand Marnier.


Tuesday, March 9, 2010

TWD: Thumbprint For Us Big Guys


Mike of Ugly Dude Food selected Thumbprints For Us Big Guys . When I first glanced at the recipe list I didn't realize that For Us Big Guys was part of the recipe title. I thought that Mike was making a statement for the men in our group and this was going to be a big hearty manly cookie. Wrong.  These cookies were delicate, buttery, crumbly, nutty and delicious.


I used toasted pecan in the cookies and a variety of jams, strawberry, apricot and berry in the centers.
You could easily fill the centers with nutella, ganache, or dulce de leche,  but I loved the  glistening shiny centers that the jam created. They looked like big jeweled buttons.


There are so many variations for this cookie, change your nuts, change your filling and you have a whole new taste. If you would like the recipe to make these outstanding cookies drop on over and visit Mike, or buy Dorie's book. 


Visit the TWD blog roll to see what the other bakers thought about this week's recipe.


Tuesday, March 2, 2010

TWD: Toasted-Coconut Custard Tart


This week Beryl of Cinemon Girl  picked Toasted-Coconut Custard Tart. I almost skipped this week since  I had my recipes out of order and hadn't even started on this tart when I sat down to write this post. I'm not much of a coconut fan and neither is Mr. Mimi. However, two of our children love coconut, so I quickly put together this tart for them. There are times I hear them bantering back and forth about how special they are because mom made something just for them.
This is a fairly easy recipe to whip up. The crust is Dorie's stand by press in crust, filled with a thick rum and coconut flavored pastry cream and topped with sweetened whipped cream. It was very creamy and rich with a slight crunch on top from a sprinkle of toasted coconut, and the buttery crust on the bottom was a nice base for the smooth filling. I chose to 1/2 the recipe and it made three mini tarts, one each for my coconut lovers, and one to taste for the rest of us. Although us non-coconut lovers ate just our mandatory taste-test bite, Boy Mimi was licking his plate and "offering" to finish off the rest of these little tarts.

Toasted Coconut Custard Tart
adapted from Baking From My Home To Yours

For the Custard
2 cups milk
1/2 cup sugar
6 large egg yolks
1/3 cup cornstarch
pinch of salt
pinch or coriander
1 tbsp Malibu rum
1 tsp vanilla extract
3 1/2 tbsp cold unsalted butter, cut into small pieces
1 cup shredded sweetened coconut, toasted
1 9-inch sweet tart shell, baked and cooled

For the topping
1 cup cold heavy cream
3 tbsp powdered sugar, sifted
1/2 tsp Malibu rum
1/2 tsp vanilla extract


Bring milk to a boil. In a large saucepan, whisk together sugar, yolks, cornstarch, salt and coriander until well blended. Whisk in 1/4 cup of hot milk to temper the yolks, then whisk in the rest of the milk. Continue whisking over medium heat and bring to a boil. Whisk an additional 1 or 2 minutes then remove from heat. Whisk in rum and vanilla and let sit for 5 minutes. Then whisk in the butter, stirring until custard is smooth. Stir in the toasted coconut. Transfer to a container, cover the surface of the custard with plastic wrap and refrigerate until cold.
To make the topping, use a stand mixture with whisk attachment or a hand mixer to whip the cream to medium peaks. Add the powdered sugar and beat to firm peaks. Whip in rum and vanilla.
To assemble the tart, whisk the custard vigorously to loosen it then scrape into the crust. Spoon the whipped cream over the tart and spread evenly to the edge of the custard. Sprinkle with toasted coconut.
printable recipe
This really was a good tart, I just don't like the stringy coconut in my creamy filling.  Next time I would use coconut milk to make the pastry cream and only put the toasted coconut on the top of the tart.  If you want the recipe for this tart visit Beryl at Cinemon Girl or you can find it in Dorie's book. Visit the TWD  blogroll to see what the other bakers made this week.