Tuesday, October 27, 2009

TWD: Cherry-Fudge Brownie Torte


This week's recipe was selected by April of Short + Rose who decided on Cherry-Fudge Brownie Torte.

The pictures are not the best, but in my defense, it was dark when we finished the torte and I need natural light to take pictures. There was no way my family was going to wait until the next day to eat this just so I could take decent pictures. Sometimes you have to take what you can get when it's one photographer against four hungry taste-testers!
This ultra rich torte features a fudge brownie base, laced with dried cherries, cherry preserves, black pepper and chocolate chunks. The brownie is then topped with mascarpone mousse. Rich!


  Although this was the perfect combination of a dense and fudgy brownie with light and creamy mousse there are two things I would do differently next time. First, I think the flavor of the cherry preserves got lost in the brownie batter. Next time I will use them as a separate layer between the brownies and the mousse. Secondly, this torte improved with age, so I would definitely make it the day before serving.

If you want the recipe for this wonderful dessert visit April at Short + Rose.

Reblog this post [with Zemanta]

DB: Macaroons

THE DARING BAKERS OCTOBER  CHALLENGE: MACAROONS


The 2009 October Daring Bakers' challenge was brought to us by Ami S. She chose macaroons from Claudia Fleming’s The Last Course: The Desserts of Gramercy Tavern as the challenge recipe.
Thank you Ami for hosting this month's challenge. We really had a good time learning to make these delicious cookies. They were easy to make, and come with endless flavor possibilities for both the cookie and the filling. I will definitely be making these again!

Our first batch had a chocolate ganache filling and the second had a whipped white chocolate espresso ganache for the filling. Both were fantastic. I didn’t try to vary the flavor and color of the cookies because I  wanted to be sure that I could make them successfully before experimenting.

On the first attempt the batter seemed too thick; the resulting cookies had feet but didn't have a smooth and shiny surface. Even though they didn't look like Ami's picture, the cookies still tasted great. On the second and third batch I used the recipe on Syrup & Tang, which was simpler, since all the ingredients are based on the weight of the egg whites. Whenever I have extra egg whites I toss them into a cup and put them in the refrigerator until I have a need for them, and almost always forget how many egg whites are in the cup. The Syrup & Tang recipe solved that problem because it is based on a ratio of egg whites to the other ingredients so all you have to do is weigh egg whites and add the proper amount of sugar, almond meal and confectioner's sugar. This method resulted in cookies that had a smooth shiny crust and a chewy center, which is exactly how a macaroon should look and taste.

Macaroons with white chocolate espresso ganache filling.


Ingredients


Confectioners’ (Icing) sugar: 2 ¼ cups (225 g, 8 oz.)
Almond flour: 2 cups (190 g, 6.7 oz.)
Granulated sugar: 2 tablespoons (25 g , .88 oz.)
Egg whites: 5  (at room temperature)

Directions:

1. Preheat the oven to 200°F (93°C). Combine the confectioners’ sugar and almond flour in a medium bowl. If grinding your own nuts, combine nuts and a cup of confectioners’ sugar in the bowl of a food processor and grind until nuts are very fine and powdery.

2. Beat the egg whites in the clean dry bowl of a stand mixer until they hold soft peaks. Slowly add the granulated sugar and beat until the mixture holds stiff peaks.

3. Sift a third of the almond flour mixture into the meringue and fold gently to combine. If you are planning to add zest or other flavorings to the batter, now is the time. Sift in the remaining almond flour in two batches. Be gentle! Don’t overfold, but fully incorporate your ingredients.

4. Spoon the mixture into a pastry bag fitted with a plain half-inch tip (Ateco #806). You can also use a Ziploc bag with a corner cut off. It’s easiest to fill your bag if you stand it up in a tall glass and fold the top down before spooning in the batter.

5. Pipe one-inch-sized (2.5 cm) mounds of batter onto baking sheets lined with nonstick liners (or parchment paper).

6. Bake the macaroon for 5 minutes. Remove the pan from the oven and raise the temperature to 375°F (190°C). Once the oven is up to temperature, put the pans back in the oven and bake for an additional 7 to 8 minutes, or lightly colored.

7. Cool on a rack before filling.

Yield: 10 dozen. Ami's note: My yield was much smaller than this. I produced about two dozen filled macaroons.
Macaroons with semi-sweet chocolate ganache filling.

If you want to try the Syrup and Tang method just follow this link.

Tuesday, October 20, 2009

Sweet Potato Biscuits

TWD: Sweet Potato Biscuits
 
 
October 20,Tuesday's with Dorie recipe, Sweet Potato Biscuits was selected by  Erin of Prudence Pennywise.   They were light, tender, and creamy biscuits with a beautiful orange color.  The mild sweet potato flavor was enhanced by cinnamon or nutmeg.  A dab of butter and a drizzle of honey and you are good to go.

     Although they look like a hockey puck, that's where the resemblance ends. The biscuits were soft and moist, but not overly flaky and didn't raise very much. In order to make biscuits or scones flaky, I cut the butter into the flour, then I put the mixture in the fridge until the butter has hardened again, usually between 10 and 20 minutes.
    Would I make them again? Sure if I wanted to have the beautiful orange color.  The flavor of sweet potato was a little too mild and they weren't as flaky as I would like. With a few modifications they would make delicious scones for Halloween breakfast.

Sweet Potato Biscuits
by Dorie Greenspan

Makes about 18 biscuits
2 cups all-purpose flour
2 tablespoons (packed) light brown sugar
1 tablespoon baking powder
1 teaspoon salt
3/4 stick (6 tablespoons) cold unsalted butter, cut into 12 pieces
2 15-ounce cans sweet potatoes in light syrup, drained and mashed
Pinch of ground cinnamon or freshly grated nutmeg (optional)

GETTING READY: Center a rack in the oven and preheat the oven to 425 degrees F.
Get out a sharp 2- to 2 1/4-inch-diameter biscuit cutter, and line a baking sheet with parchment or a silicone mat.
Whisk the flour, baking powder, salt and spice, if you're using it, together in a bowl. Add the brown sugar and stir to incorporate it, making sure there are no lumps. Drop in the butter and, using your fingers, toss to coat it with flour. Quickly, working with your fingertips (my favorite method) or a pastry blender,cut and rub the butter into the dry ingredients until the mixture is pebbly. You'll have pea-size pieces, pieces the size of oatmeal flakes and pieces the size of everything in between -- and that's just right. Add the sweet potatoes to the bowl, grab a fork, and toss and gently turn the ingredients until you've got a nice soft dough. Now reach into the bowl with your hands and give the dough a quick, gentle kneading -- 3 or 4 turns should be just enough to bring everything together.
Lightly dust a work surface with flour and turn out the dough. Dust the top of the dough very lightly with flour and pat the dough out with your hands or roll it with a pin until it is about 1/2 inch high. Don't worry if the dough isn't completely even -- a quick, light touch is more important than accuracy. Use the biscuit cutter to cut out as many biscuits as you can. Try to cut the biscuits close to one another so you get the most you can out of this first round. By hand or with a small spatula, transfer the biscuits to the baking sheet. Gather together the scraps, working them as little as possible, pat out to a 1/2-inch thickness and cut as many additional biscuits as you can; transfer these to the sheet. (The biscuits can be made to this point and frozen on the baking sheet, then wrapped airtight and kept for up to 2 months. Bake without defrosting -- just add a couple more minutes to the oven time.)
Bake the biscuits for 14 to 18 minutes, or until they are puffed and golden brown. Transfer them to a cooling rack -- cooled a bit, they're more sweet potatoey. Give them 10 to 15 minutes on the rack before popping them into a basket and serving.

SERVING: Unlike most biscuits, these are best served after they've had a little time to cool. They are as good at brunch (they're great with salty ham and bacon) as they are at tea (try them with a light cheese spread and/or marmalade). Or have them with butter or jam, fruit butter or fruit compote.
STORING: You can keep the biscuits in a plastic bag overnight and give them a quick warm-up in the oven the next day, but you won't recapture their freshly made flakiness.

Thursday, October 15, 2009

Hocus Pocus Pumpkin Cupcakes


Check out all of the entries and vote for the October Cupcake Hero now thru October 21 at

     When I ventured over to I Heart Cuppycakes! I met up with the cupcake heroes. What a fun and creative group of bakers! Their cupcakes looked so fantastic. I wanted to bake cupcakes; I wanted to be a cupcake hero.

   Booo-tiful Pumpkins is the theme for October. The cupcakes have a delicate pumpkin flavor and a velvety texture, and are topped with a light and airy caramel buttercream. I was so focused on creating pumpkin cupcakes that were rich and flavorful but didn't have the dense heaviness of pumpkin bread that I totally jelled on the decoration aspect of the theme, but I didn't have to worry The Frosted Cake 'n Cookie had my back. A visit to this very talented baker's blog taught me how to make these adorable witches hats.  If you haven't stopped by before, you should definitely make a visit.

Hocus Pocus Pumpkin Cupcakes
 with Carmel Buttercream

Makes 9 cupcakes

1 cup All Purpose Four
¼ tsp baking soda
1 tsp. baking powder
1 tsp ground ginger
½ tsp salt
½ tsp cinnamon
¼ tsp ground nutmeg
Pinch cloves

2.5 oz unsalted butter, room temperature
2/3 cup light brown sugar
1 egg
1/3 cup buttermilk
1/3 cup canned pumpkin puree

In small bowl whisk together flour, baking soda, baking powder, salt and spices. Set aside.

Cream together butter and sugar until light and fluffy with an electric mixer. Add the egg and continue beating until incorporated. Add pumpkin puree and mix well. Add the flour mixture in 3 batches, alternating with 2 additions of buttermilk. Mix well; batter will be fluffy.

Scoop batter into prepared muffin tins. Bake at 350 for 15-18 minutes until golden. Let cool completely before frosting.


Caramel Buttercream Frosting:

2 egg whites
3 Tablespoons sugar

4 Tablespoons sugar
¼ cup boiling water

1 cup soft unsalted butter
¼ tsp salt
1 tsp vanilla
1 1/3 cups confectioners’ sugar.

In bowl of electric mixer beat egg whites until soft peaks form. Slowly add the 3 tablespoon sugar while beating at high speed until thick and glossy.

In a heavy bottom pan evenly sprinkle 4 tablespoons sugar. Place pan over medium heat and cook, swirling pan by the handle, until the sugar melts and turns a golden brown.  Remove from heat and carefully stir in the boiling water, using a long handled wooden spoon . Caramel will sputter and bubble when you add the water. Stir to dissolve all of the caramel.

With the mixer on low speed slowly add the warm caramel mixture to the beaten egg whites. When all of the caramel has been incorporated, turn the mixer on high and continue beating until cool,scraping down the sides of the bowl as necessary.When the mixture is cool reduce speed to medium high and add the butter 1-2 tablespoons at a time until incorporated. Add the confectioner’s sugar, vanilla and salt and continue beating until light and fluffy.
printable recipe


Witches hat's are made with fondant and if you want detailed direction visit The Frosted Cake 'n Cookie


Tuesday, October 13, 2009

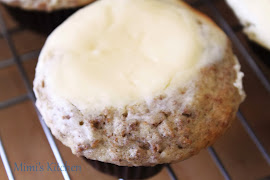
TWD: Allspice Crumb Muffin


This week's recipe, Allspice Crumb Muffins, selected by Kayte of Grandma's Kitchen Table, had a nice delicate flavor and a rich brown sugar crumb topping.
They were super easy to prepare, since no mixer  was needed.  If you're not an allspice fan, not to worry- you can easily substitute nutmeg, cinnamon, pumpkin or apple pie spice mix. Around here everybody has an opinion and Boy Mimi thought I should add some grated apples, which I think would add a nice fall flavor.


Allspice Crumb Muffins
Baking:from my home to yours by Dorie Greenspan

For the Streusel:
1/2 cup all-purpose flour
1/2 cup (packed) light brown sugar
1/2 teaspoon ground allspice
5 Tablespoons cold unsalted butter, cut into bits

For the Muffins:
2 cups all-purpose flour
1/2 cup sugar
1 Tablespoon baking powder
1/2 teaspoon ground allspice
1/4 teaspoon salt
1/4 cup (packed) light brown sugar
1 stick (8 Tablespoons) unsalted butter, melted and cooled
2 large eggs
3/4 cup whole milk
1/4 teaspoon pure vanilla extract
Grated zest of 1 lemon (optional)

Getting ready:  Center a rack in the oven and preheat the oven to 375 degrees F. 
Butter or spray the 12 molds in a regular-size muffin pan or fit the molds with greasing nor paper cups.  Place the muffin pan on a baking sheet.

To Make the Streusel:  Put the flour, brown sugar and allspice in a small bowl and sift them through your fingers to blend.  Add the bits of cold butter and toss to get irregularly shaped crumbs.  Set aside in the refrigerator for the moment.  (You can make the crumbs up to 3 days ahead and keep them covered in the refrigerator.)

To Make the Muffins:  In a large bowl, whisk together the flour, sugar, baking powder, allspice and salt.  Stir in the brown sugar, making certain there are no lumps.  In a large glass measuring cup or another bowl, whisk the melted butter, eggs, milk, and vanilla extract together until well combined.  Pour the liquid ingredients over the dry ingredients and, with the whisk or a rubber spatula, gently but quickly stir to blend.  Don't worry about being thorough--the batter will be lumpy, and that is just the way it should be.  Stir in the lemon zest, if you're using it.
 
Divide the batter evenly among the muffin cups.  Sprinkle some streusel over each muffin, then use your fingertips to gently press the crumbs into the batter.

 Bake for about 20 minutes, or until the tops are golden and a thin knife inserted into the center of the muffins comes out clean.  Transfer the pan to a rack and cool for 5 minutes before carefully removing each muffin from its mold. 


Posted by Picasa

Saturday, October 10, 2009

Apple Raisin Cake with Caramel Sauce


 It’s officially autumn here in Southern California. They days are lovely and warm and nights are brisk and cool. I can no longer wear shorts and flip flops to Boy Mimi's Friday night football games. I actually need a jacket to stay warm (okay so it’s only a cotton jacket not a parka). I am not complaining - the cool weather is a welcome change. Besides needing long pants and a jacket, the cool weather makes a slice of this moist apple cake, drizzled with warm caramel sauce and paired with a hot drink a great way to celebrate a victory or console yourself after a defeat.
     This cake is one I have been making for many years. It's loaded with apples, raisins and toasted nuts.  The caramel sauce is an old stand by from Julia Child’s The Way to Cook.  It's one I always have on hand to dress up apple, pear and pumpkin desserts in the fall and ice cream sundaes in the summer.

 Apple Raisin Cake with Caramel Sauce

Cake

1/1/2 cup AP flour
½ cup cake flour
½ tsp baking soda
1 tsp baking powder
½ tsp cinnamon
½ tsp salt
½ tsp freshly grated nutmeg
Pinch each cloves, mace and ginger
1 cup unsalted butter
1/1/2 cups sugar
2 eggs
2 ½ cups peeled chopped granny smith apples
2/3 cup raisin, plumped in 1/3 cup bourbon and drained
½ cup chopped roasted pecans.

Plump raisins: Place raisin in a small pan, add bourbon and heat to a simmer. Turn off heat. Let raisins soak for at least 10 minutes. When ready to use drain, reserving the liquid.

Butter and flour a 9 inch spring form pan.
Preheat oven to 325 degrees F

In a medium bowl mix together the flours, baking soda, baking powder and all spices.

Cream together butter and sugar until light and fluffy. Add eggs one at a time, beating well after each addition. Add 1 tablespoon of the bourbon reserved from the raisin, beat until light and fluffy about 30 seconds.

Fold in the dry ingredients, followed by the apples, raisins and nut. Spread batter into prepared pan. Bake for 1 hour, or until a tester inserted in the center comes out clean. Cool completely.


While cake is baking make Caramel Sauce:

Caramel Sauce

1 cup sugar
1/3 cup water
1 cup cream
2 tsp vanilla
Pinch of salt

Blend the sugar and water in a 1 ½ qt sauce pan and bring to a simmer, brushing the sugar from the sides of the pan with a pastry brush and water.  Remove from heat and swirl the pan by the handle to make sure all of the sugar has dissolved and the liquid is perfectly clear. Return pan to moderately high heat; cover and boil for several minutes. After a minute or so peek at syrup, when the bubbles are thick uncover the pan.

Continue boiling, swirling the pan by the handle until the syrup begins to color. When it is a light caramel color remove from the heat and continue swirling and the color will darken more. To stop cooking place bottom of the pan in cool water.

Slowly add the cream, which will congeal the caramel. Return pan to low heat and simmer, stirring until the caramel dissolves. Remove from heat; stir in vanilla and salt. Use warm or cooled. Refrigerated in a covered jar, the sauce will keep for weeks.
 printable recipe
 

Reblog this post [with Zemanta]

Tuesday, October 6, 2009

Chocolate and Vanilla Pudding

TWD: Split Level Pudding

This week's Tuesday with Dorie recipe was chosen by Garrett of Flavor of Vanilla. This sophisticated two layer pudding was easy to make. The bottom layer is a chocolate ganache covered by a smooth and creamy vanilla pudding. What I really like about this combination is not just the flavors, but the fact that the ganache is much firmer than the custard but not hard and brittle the way chocolate gets when it is refrigerated. The ganache was creamy and firm yet still spoonable; it was like having a piece of chocolate in each bite followed by the cool silky texture of the pudding. The flavor combinations are endless; my next rendition will be to add orange zest to the pudding and Grand Marnier to the ganache. To help keep the layers separate when adding the second layer, use a teaspoon with bowl side up, position it just over the first layer, and then pour your second layer letting it gently slide off the bowl of the spoon. This is a perfect do ahead dessert for entertaining.
If you want to make this delicious  dessert stop on over at The Flavor of Vanilla,  or buy Dorie's book.
Reblog this post [with Zemanta]