Saturday, July 25, 2015

Hot Chocolate Cookies


Cookies are the perfect sweet treat when to pack when you go camping. They can be made ahead in a large batch, don't need refrigeration, and even the simplest cookies taste extra delicious when eaten around a campfire. We have a few camping trips planned in the next few months, and as always, planning the menu is one of the most important preparation tasks. 
These cookies are family favorite, the original cookies recipe comes from Stacy Adimando's The Cookiepedia but we have changed  it up a little to suit our tastes.

One of our favorite things is the slow unexpected heat from the cayenne pepper. It gives just a little warmth at the end of a bite, and it definitely makes you want to go back for more. Without the pepper, these are simple but good chocolate cookies, but our family can't resist that little surprise flavor the cayenne adds. These are definitely on our camping menu this summer, and I know they will be devoured long before we return home. 

Hot Chocolate Cookies

3/4 cup plus 2 tablespoons flour 
2 tbs cocoa powder 
1 tsp baking powder
1/4 tsp salt 
1/2 tsp cayenne pepper
6 oz semisweet chocolate chips, melted and cooled to room temperature 
2 oz butter
1/2 cup plus 2 tbs dark brown sugar 
2 medium eggs
1 tsp vanilla 
4 oz semisweet chocolate chips

 Beat butter and sugar until light and fluffy. Add eggs one at a time, then add vanilla and melted chocolate. Mix well. Add dry ingredients, stir to combine and add chocolate chips. Chill dough 1 hr . Roll into 1-1 1/2 inch balls,bake 350 8-10 minutes. Cool on wire rack.


Tuesday, June 30, 2015

Strawberry Rhubarb Pie Ice Cream

Everyone in our family loves pie, and what is pie without a scoop of ice cream? We decided to take the best of both worlds and make a strawberry rhubarb pie ice cream, and it has quickly become one of our favorite summer treats. While rhubarb is not for everyone, Boy Mimi especially loves the sweet tart flavor it gives to pies, crumbles, and now ice cream.  When he was small, my sister owned a pie shop and she brought him his first strawberry rhubarb pie, and the rest is history. He is the first to suggest a rhubarb treat as soon as we see some at the farmer's markets in the spring.

Although I usually have a fairly successful garden, rhubarb is something I've had a difficult time growing. This year I finally had enough to make a few batches of jam with some rhubarb left over for a few extra treats. For this ice cream, we used a combination of our classic vanilla base with a strawberry rhubarb swirl, and topped it off with the pie crust crumble from the Momofuku Milk Bar cookbook. It might look like just a scoop of ice cream, but the tartness of the rhubarb and the sweetness of the strawberries, combined with the creamy vanilla ice cream and crunchy pie crust all make for a few perfect bites full of the taste of summer. I hope my rhubarb is successful again next year- this ice cream will be one of the first things we make. 


 Strawberry Rhubarb Pie Ice Cream

Ice Cream
5 egg yolks
1/2 cup sugar
1 3/4 cups heavy cream
3/4 cups milk (I use 2%)
2 Tablespoons corn syrup
2 teaspoons vanilla
1/2 teaspoon salt

In a bowl,mix the eggs yolks with half of the sugar. In a medium sauce pan heat milk,cream, remaining sugar and corn syrup together until it simmers.
Gradually add the milk to the egg mixture. Return mixture to pan and cook stirring constantly until thickened and coats the back of a wooden spoon. Mixture will hold a clear path when you run your finger across the spoon.
Remove from heat, strain through a fine mesh strainer, stir in vanilla and cool to room temperature. Chill mixture 3 to 4 hours or overnight before processing  in your ice cream maker, according to manufacturers directions.

Strawberry- Rhubarb Swirl
1 cup chopped strawberries
1 cup chopped rhubarb 
1/2- 1 cup sugar depending on the sweetness of the strawberries
juice of 1/2 lemon.

Mix all ingredient in a sauce pan. Stirring constantly, bring to a boil and cook for about 4-6 minutes until mixture thickens slightly (like runny jam, it will thicken further as it cools). Cool to room temperature and chill until ready to use.

Pie Crumbs 
 Momofuku Milk Bar 
1 1/2 cup flour
2 tablespoons sugar
3/4 teaspoon kosher salt
1 stick butter melted 
1 1/2 tablespoons water

 Heat oven to 350 F. Combine flour, sugar and salt in the bowl of a stand mixer fitted with the paddle attachment and paddle on low speed until well mixed. Add the butter and water and paddle on low speed until mixture starts to come together in small clumps. Spread the clumps on a parchment/silpat lined baking sheet. Bake for 25 minutes, breaking up the clumps occasionally.
The crumbs should be golden brown and still slightly moist to the touch at that point; they will dry and harden as they cool. When ice cream has churned, swirl in the strawberry rhubarb mixture. Freeze until firm. Sprinkle with pie crumb  when serving.
printable recipe


Link:Foodie Friday

Wednesday, May 27, 2015

Blueberry Pie


This year, the blueberries were the first plant to produce fruit in our garden. It started with one delicious handful a day, then quickly turned into bowls full of fruit every other day. We ate them plain, on yogurt, made jam, and made this blueberry pie for dessert. Blueberry pie is one of my all time favorite desserts, and this one is packed with juicy homegrown blueberries and a sweet crispy crumb topping.


The filling is simple, with very little added to the fruit so the blueberries really shine. The crumb gives a little bit of sweet crunch, and looks extra pretty with blueberry juice oozing through the top. A slice of pie after dinner on the patio is my idea of the perfect ending to a summer day.


Blueberry Crumble Pie
adapted from Epicurus 
  
One single pie crust. I use America's Test Kitchen fool proof pie crust.

Filling :
2/3 cup plus 3 tablespoons sugar
2 1/2 tablespoons cornstarch
1 teaspoon finely grated lemon zest plus 2 tablespoons fresh lemon juice
5 cups (1 pound 10 ounces) fresh blueberries

Topping
3/4 cup unbleached all-purpose flour
3 tablespoons (packed) light brown sugar
1/2 teaspoons cinnamon
1/4 teaspoon salt
5 tablespoons unsalted butter, melted, cooled slightly

Use a 9"–9 1/2"-diameter glass or metal pie dish. You will need pie weights or dried beans to bake the crust.
preparation


Roll out dough on a lightly floured surface to a 13" round. Transfer to pie dish, gently pressing dough onto bottom and up sides of dish. Fold overhang under and crimp edges decoratively. Pierce bottom of crust in several places with a fork, then chill until firm, about 30 minutes.
Line a large baking sheet with foil and place on a rack in middle of oven; preheat to 375°F. Line crust with parchment paper or foil and fill with pie weights. Bake until crust is set, about 20 minutes. Carefully remove parchment and pie weights. Bake until crust is pale golden, about 12 minutes longer. Transfer crust to a wire rack; let cool.

Filling:
Whisk 2/3 cup sugar, cornstarch, and lemon zest in a large bowl. Add blueberries and lemon juice; toss gently to coat and evenly distribute. Let filling stand, tossing occasionally, until berries release their juices, 20-30 minutes.**

 Topping:
Whisk flour, remaining 3 tablespoons sugar, light brown sugar, cinnamon, and salt in a medium bowl. Add melted butter; mix topping with fingertips to blend.

Assembly:
Preheat oven to 375°. Spoon blueberry filling into crust, then sprinkle topping over. Bake pie until filling is bubbling and topping is golden, about 1 hour 15 minutes. Cover with foil after 30 minutes if browning too fast.

**Use cook pie crust and frozen blueberries by weight. If using frozen blueberries precook filling on stove top until filling comes to a boil.

printable recipe


Link:Foodie Friday

Wednesday, April 22, 2015

Milk Bar Funfetti Birthday Cake


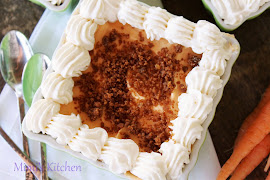
  Our friend Mrs. A has been creating pinterest worthy moments long before blogs and pinning were a thing. We have been blessed to share in a good part of those moments, from unbelievable themed birthday parties to the most All-American 4th of July barbecues, and Christmas wouldn't be the same if we didn't giggle over trivia games and stuff ourselves with her famous meatballs on Christmas Eve. She has been making our lives special in so many ways for the past 25 years, and such a wonderful friend deserves a special birthday dessert. 


We wanted to make something amazing for Mrs. A, and this cake has been on the special occasion list for quite a while, so her birthday was the perfect time to pull out all the stops.

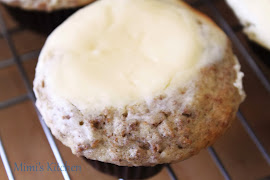
 This is a really long and involved recipe, but each step on its own is relatively easy and they can be done several days in advance.  This is not something that can be done at the last minute, and takes a bit of planning, but it is absolutely worth it.  The cake itself is delicious, with flavors similar to the boxed Funfetti of childhood, but better because it is homemade.  The crumb layer inside gives a nice sweet crunch, and the frosting is light and smooth, and not overly sweet.

Our family would not be the same without Mrs. A, and we look forward to many more celebrations with her. We know we can count on her for beautiful, creative decorations, and we will bring the cake. 


Birthday Cake
adapted from Milk. Momofuku Milk Bar by Christina Tosi

1 recipe Birthday Cake
1 recipe Birthday Cake soak
1 recipe Birthday Cake frosting
1 recipe birthday Birthday Cake crumb
1 6 inch cake ring
2 acetate strips 3 inches wide and 20 inches long.
One bottle clear vanilla extract (you need this if you want it to taste like the boxed  funfetti cake.)

Birthday Crumb
1/2 cup (100g)  granulated sugar
1 1/2 tablespoon (25g)  light brown sugar, tightly packed
3/4 cup  (90g) cake flour
1/2 teaspoon (2g) baking powder
1/2 teaspoon (2g) kosher salt
2 tablespoons (25g) rainbow sprinkles
1/4 cup (40g) grape seed oil
1 tablespoon (12g) clear vanilla extract

Heat oven to 300f

Combine the 1st six ingredients in the bowl of a stand mixer. Mix on low speed until well combined.
Add the oil and vanilla and paddle again to distribute, continue paddling until mixture forms clusters.
Spread the clusters on a parchment or silpat lined baking sheet. Bake for 20,minutes, breaking them up occasionally. The crumbs should be slightly moist to the touch, they will dry and harden as they cool. Cool completely before using in recipe.

Birthday Cake
4 tablespoons(50g) butter, room temperature
1/3 cup (60g) vegetable shortening
1 1/4 cups (250g) granulated sugar
3 tablespoons (50g) light brown sugar tightly packed
3 eggs
1/2 cup(110g) buttermilk
1/3 cup (65g) grape seed oil
2 teaspoons (8g) clear vanilla extract
2 cups (245g) cake flour
3/4 teaspoon (3G) kosher salt
1/4 cup(50g) rainbow sprinkles
Additional 2 tablespoons (25 g) rainbow sprinkles

Heat oven to 350f

Combine the butter, shortening and sugars in the bowl of a stand mixer fitted with the paddle attachment, cream together on medium high speed for 2-3 minutes. Scrape down the sides of the bowl, add the eggs, and mix on medium high speed for 2-3 more minutes. Scrape the sides of the bowl.
On low speed stream in the buttermilk, oil and vanilla. Increase speed to medium high and paddle for 4-6 minutes until the mixture is practically white, twice the size of the original fluffy butter sugar mixture and completely homogenous. Don't rush the process,  there should be no streaks of fat or liquid.

On very low speed add the cake flour, baking powder, salt and the 1/4 cup of  sprinkles. Mix 45-60 seconds, just until your batter comes together. Scrape the sides of the bowl.

Spray a quarter sheet pan with cooking spray and line it with parchment paper. Spread the batter in an even layer in the pan. Sprinkle the remaining 2 tablespoons of sprinkles evenly over the top of the batter.
Bake cake for 30-35 minutes. The cake will rise and puff, doubling in size, but  will remain slightly buttery and dense. At 30 minutes, gently poke the edge of the cake with your finger, the cake should bounce back slightly and the center should no longer be jiggly. Leave in the oven for an extra 3-5 minutes if it doesn't pass these test.
Remove cake from oven and cool on a wire rack.

Birthday cake soak
1/4 cup (55g) milk
1 teaspoon (4g)  clear vanilla extract
Whisk together in a small bowl.

Birthday cake frosting
8 tablespoons (115g) butter, room temperature
1/4 cup (50g) vegetable shortening
2 ounces (55g) cream cheese
1 tablespoon (25g) glucose or  2 teaspoon (12g) corn syrup
1 tablespoon (18g) corn syrup
1 tablespoon (12g) clear vanilla extract
1 1/4. Cups (200g) confectioners sugar
1/2 teaspoon (2g) kosher salt
Pinch (.25g) baking powder
Pinch (.25g) citric acid (fruit fresh)

In the bowl of a stand mixer, with paddle attachment combine butter, shortening and cream cheese, paddle on medium high for 2-3 minutes, until smooth and fluffy. Scrap down the side of the bowl
With mixer on low speed,  stream in the glucose, corn syrup and vanilla. Change speed to medium high and beat 2-3 minutes until silky smooth and a glossy whites. Scrape down the sides of the bowl.
On low speed,add confectioners sugar, salt baking powder and citric acid and mix to incorporate. Increase the speed to medium high and beat. For 2-3 minutes  until you have a stark white smooth frosting.

Assembly
Invert cake on clean parchment paper, peel off the parchment on the bottom of the cake. Use a six inch cake ring to cut out 2 cake circles, these are the top 2 layers. You will use the scrapes to fit into the cake ring for the bottom layer. Clean cake ring

On a clean piece of parchment place your cake ring line the inside with an acetate strip, and fit the cake scrapes in the ring and tamp to an even layer.

Using a pastry brush on 1/2 the birthday cake soak.

Spread 1/5 of the frosting in an even layer over the cake.

Sprinkle with 1/3 of the birthday crumbs evenly over the top of the frosting. Use the back of your hand to anchor them in  place.

Use the back of a spoon to spread a second 1/5 of the frosting as evenly as possible over the crumbs.

With your index finger, gently tuck the second strip of acetate between the cake ring and the top 1/4 inch of the first strip of acetate, so that you have a clear ring of acetate 5-6 inches tall-high enough to support the height of the cake.

Set a cake round on top of the frosting, brush with remaining birthday cake soak, spread with 1/5 of frosting, followed by 1/3 cup birthday cake crumbs, 1/5 frosting. Top with remaining cake layer and cover with the last 1/5 frosting. Garnish frosting with the remaining birthday crumbs.

Freeze complete cake for 12 hour to set the cake and filling. I just put mine the the fridge overnight.
3 hours before serving remove cake from freezer and pop the cake out of the cake ring,push up form the bottom,  peel off acetate , cover in plastic wrap defrost in the fridge for minimum 3 hours.

** I have assembled cakes with the cake ring and acetate strips, but this time I was serving this cake at a big birthday dinner so I use 1  1/2 x the recipes and baked the cake batter in 3 - 8 inch cake pans. I  weighed all ingredients and assembled the cake on a cake plate without using acetate strips and chilled overnight in the fridge


printable recipe

link; Foodie Friday

Sunday, March 29, 2015

Lemon Spaghetti

We are very fortunate to have some wonderfully talented people in our lives, and one such person happens to be Doug Braun, owner of Presidio Winery. Doug is passionate about producing biodynamic, sustainable wines in the Santa Barbara, CA area, and showcases his wines in his tasting room in  nearby Solvang, CA.
After talking all things wine and food recently, Doug and I decided to combine our talents with some wine and food pairings using his wine choices from the Presidio Wine Club. One of the wines for March was the 2012 Pinot Gris, a medium bodied white wine, with apple and pear fruit notes and a nice mineral finish. We tasted this wine with a couple of recipes, but this lemon spaghetti really made both the wine and the recipe shine.

The lemon flavor in the pasta really picked up the fruit in the wine, but was also not overpowered by the slight bitterness at the end. As for the pasta itself, it was a really easy recipe to make. The sauce can be mixed and the shrimp can be cooked in the time it takes the pasta to boil, and then everything is tossed together to make a delicious, easy dish perfect for busy weeknights and the upcoming warmer spring evenings.

Lemon Spaghetti with Shrimp
Adapted from Giada De Laurentis, via Food and Wine


Vegetable oil, for frying
1/4 cup capers, rinsed, drained and patted dry
1 pound spaghetti
2/3 cup plus 1 tablespoon extra-virgin olive oil
1 cup freshly grated Parmigiano-Reggiano cheese
1 tablespoon finely grated lemon zest
1/2 cup fresh lemon juice (from 3 lemons)
1 pound large shrimp, shelled and deveined
Salt
Pepper
1/2 cup chopped Italian flat leaf parsley ( or basil), plus more for garnish


In a skillet, heat 1/4 inch of vegetable oil until shimmering. Add the capers and fry over moderately high heat, stirring, until browned and crisp, 3 minutes. Using a slotted spoon, transfer the capers to paper towels to drain.
In a saucepan of salted boiling water, cook the spaghetti until al dente. Drain, reserving 1 cup of the cooking water. 
While the pasta cooks, in a medium bowl whisk 2/3 cup of the olive oil with the grated cheese, lemon zest, ¼ tsp.salt (or to taste), and 1/3 cup of lemon juice. Reserve remaining lemon juice to add as needed for taste.


In a very large skillet, heat the remaining 1 tablespoon of olive oil until shimmering. Season the shrimp with salt and pepper, add to the skillet and cook over moderately high heat, turning once, until just opaque, about 5 minutes total. Reduce the heat to moderate and add the pasta, lemon sauce, half of the reserved pasta water and the 1/2 cup of parsley. Cook, tossing, until the pasta and shrimp are coated, 2 minutes, adding more of the pasta water if the spaghetti is dry; transfer to shallow bowls, garnish with parsley and the fried capers and serve.
printable recipe
 
Notes:
Lemons vary in acidity and flavor. Start with 1/3 cup of juice add more to bring up the flavor if necessary. 
 If you don't do shrimp this would be just as good as a side dish with grilled chicken or scallops.
The original recipe called for basil, but I used flat leaf parsley for its fresh citrusy flavor.


For more information on Presidio Wines visit their web page

Wednesday, February 25, 2015

Lemon Bars


 One of my favorite things about cooking and baking is that each season has something to look forward to in the kitchen. The summer brings overflowing  vegetable from the gardens and juicy stone fruit, the holidays are full of pumpkin and peppermint, and January brings an abundance of citrus to the table.   

We love to have a bowl of tangerines and oranges for snacking and fresh juice, limes are squeezed into fun cocktails, and lemons very quickly turn into these lemon bars. We have been making these for so many years I'm not sure where the original recipe came from, but I do know that they are a staple in January when we are looking for a sweet treat to highlight all the lemons we acquire!


Lemon Bars
Ingredients
2 cups plus 2 Tablespoons flour
½ cup powdered sugar
½ teaspoon salt
1 cup butter, soft or melted
4 eggs slightly beaten
2 cups sugar
6 tablespoons lemon juice
Zest of one lemon
1 teaspoon baking powder
Optional  1/2 -1 teaspoon citric acid 
Pre heat oven 350F.
Crust:
Butter and flour or line with a foil sling a 9x13 pan (quarter sheet pan)
In a food processor combine 2 cups flour, ½ cup powdered sugar, salt and butter. Pulse to mix. Press mixture evenly into prepared pan. Bake for 20 minutes.
Filling:
In medium mixing bowl add eggs, beat with electric mixer to combine. Add sugar, lemon juice, zest, remaining 2 tablespoon flour, baking powder and citric acid is using. Beat until thoroughly combined. You can use the food process for the filing.  Pour over baked crust. Bake at 350 for 25 minutes, until center is set and edges are golden.


Cool in pan. Sprinkle top with powdered sugar. Cut in desired size and sprinkle with more powdered sugar.
If your lemons are not tart enough add ½- 1 teaspoon citric acid (fruit fresh) to the filling.
For easier cutting line baking pan with a foil sling, (Line pan with 2 sheets of foil - one down the length of the pan extending  over the ends and the other over the width extending over the sides.) spray with PAM. When the bars are cooled, lift the sling out of the pan to a flat surface for cutting.
 printable recipe